Contact author: Melissa Graham
Last verified to run: 2024-10-21
LSST Science Pipelines version: Weekly 2022_40
Container Size: large
Targeted learning level: advanced
WARNING: This notebook will only run with LSST Science Pipelines version Weekly 2022_40.
To find out which version of the LSST Science Pipelines you are using, look in the footer bar or execute the cell below.
! echo $IMAGE_DESCRIPTION
Weekly 2022_40
If you are using w_2022_40, you may proceed with executing the tutorial.
If you are not using w_2022_40 you must log out and start a new server:
w_2022_40.Why do I need to use an old image for this tutorial notebook? In this tutorial and in the future with real LSST data, users will be able to recreate coadds starting with intermediate data products (the warps). On Feb 16 2023, as documented in the Major Updates Log for DP0.2 tutorials, the recommended image of the RSP at data.lsst.cloud was bumped from Weekly 2022_40 to Weekly 2023_07. However, the latest versions of the pipelines are not compatible with the intermediate data products of DP0.2, which were produced in early 2022. To update this tutorial to be able to use Weekly 2023_07, it would have to demonstrate how to recreate coadds starting with the raw data products. This is pedagogically undesirable because it does not accurately represent future workflows, which is the goal of DP0.2. Thus, it is recommended that delegates learn how to recreate coadds with Weekly 2022_40.
NOTICE:
This notebook will only run with the butler repo alias dp02-direct.
All other tutorial notebooks in this repository use the dp02 alias, which was updated in Oct 2024 to provide
ready-only access to butler data repos.
As this tutorial writes processed images back to the butler, "direct access" is needed and dp02-direct must be used.
Note that this is a temporary work around for Data Preview 0.
Butler functionality for Data Preview 1 will be different, as the butler service continues to evolve.
Description: Create a custom "deepCoadd" using only a subset of the input visits.
Skills: Use of pipetasks for image coaddition. Creating and writing to Butler collections. Properties of deepCoadds.
LSST Data Products: visitTable, deepCoadd images
Packages: lsst.daf.butler, lsst.ctrl.mpexec, lsst.pipe.base
Credit: Originally developed by Melissa Graham and Clare Saunders.
Get Support: Find DP0-related documentation and resources at dp0-2.lsst.io. Questions are welcome as new topics in the Support - Data Preview 0 Category of the Rubin Community Forum. Rubin staff will respond to all questions posted there.
This notebook shows how to retrieve information about the individual images that contributed to a deepCoadd, and how to make a new "custom coadd" image using only a subset of the inputs.
In the past you might have used IRAF's imcombine or AstrOmatic's SWarp (for example) to coadd images. This notebook demonstrates the appropriate method for coadding LSST images with the LSST Science Pipelines.
Science applications of coadding a subset of LSST images include searching for faint, slowly-evolving transients or variables (e.g., coadding images by season), using the effects of differential chromatic refraction (e.g., coadding images in bins of airmass), or searching for low surface brightness features (e.g., coadding only dark-time images with the faintest sky backgrounds).
Adopted science use case for custom coadds: supernova precursor events.
This notebook tutorial uses the science case of a hypothetical supernova that occurred at RA 55.745834, Dec -32.269167 on MJD = 60960.
(There is no DC2 supernova there, we just use the coordinates as an example).
Since the deepCoadds are made out of years worth of images, and are combined to remove most transient flux, the supernova itself would not appear in the deepCoadd.
However, some supernovae are known to have faint precursor eruptions, and characterizing precursor events is useful for understanding the supernova progenitor star and, e.g., its pre-supernova mass-loss episodes.
It could be possible to detect faint precursor eruptions by stacking images obtained prior to the supernova explosion.
Caveats for the adopted science use case.
This science use case of supernova precurors would be much better achieved by stacking the difference images. However, we wanted to make this a tutorial that creates custom coadds, and our science background is supernovae. So there remains a bit of a mismatch between science use case and image type for this tutorial.
This tutorial uses only i-band visits to recreate coadds, but in reality scientists looking for supernova precursor events would use all filters (searching the bluer filters in particular would be more relevant).
This tutorial uses images obtained in a one-month window prior to the supernova, but in reality scientists looking for supernova precursor events would use more windows, further in the past. That is left as an exercise for the learner in Section 5.
The simulated DC2 supernovae were all of Type Ia and no precursor events were simulated.
Source detection in custom coadds.
See the next tutorial notebook in the series, 09b_Custom_Coadd_Sources.ipynb, to learn how to run source detection and measurement on the new custom coadd.
Standard python and astropy packages for numerical processing, plotting, databases, unit conversion, etc.
LSST Science Pipelines packages for data access, display, sky coordinates, and pipeline tasks.
import getpass
import numpy as np
import matplotlib
import matplotlib.pyplot as plt
import pandas
from astropy.time import Time

import lsst.geom
import lsst.afw.display as afwDisplay
from lsst.daf.butler import Butler, DatasetType, CollectionType
from lsst.ctrl.mpexec import SimplePipelineExecutor
from lsst.pipe.base import Pipeline, Instrument
Set a few parameters related to plotting and display.
font = {'size': 14}
matplotlib.rc('font', **font)

pandas.set_option('display.max_rows', 1000)

afwDisplay.setDefaultBackend('matplotlib')
Set the DP0.2 config and collection, and instantiate a butler.
butler = Butler('dp02-direct', collections='2.2i/runs/DP0.2')
Option: display all the deepCoadd datasetTypes available via the butler.
# for x in sorted(butler.registry.queryDatasetTypes('deepCoadd*')):
#     print(x)
This example starts with a given sky coordinate. In the adopted science use case for this tutorial, consider this the coordinates of a supernova. (There is no DC2 supernova at this location, but the coordinates were chosen to be near a rich galaxy cluster, as a visually interesting target for a custom coadd).
The DC2 skyMap is used to identify the i-band deepCoadd which contains that coordinate, and then the butler is used to retrieve the deepCoadd and the list of visit ids which were combined to create it.
The visitTable is then used to obtain the acquisition dates of the input visits.
For this example, the visits in a short time range will be selected as the visits to be coadded.
Define the coordinates and filter to identify and retrieve the relevant deepCoadd.
This takes 4-5 seconds.
my_ra_deg = 55.745834
my_dec_deg = -32.269167
my_filter = 'i'

my_spherePoint = lsst.geom.SpherePoint(my_ra_deg*lsst.geom.degrees, my_dec_deg*lsst.geom.degrees)

skymap = butler.get('skyMap')
tract = skymap.findTract(my_spherePoint)
my_tract = tract.tract_id
my_patch = tract.findPatch(my_spherePoint).getSequentialIndex()
print('My tract and patch: ', my_tract, my_patch)

my_dataId = {'band': my_filter, 'tract': my_tract, 'patch': my_patch}
my_deepCoadd = butler.get('deepCoadd', dataId=my_dataId)

del my_ra_deg, my_dec_deg, my_filter, my_spherePoint, skymap, tract
My tract and patch: 4431 17
Option: display the deepCoadd image.
# fig = plt.figure(figsize=(6, 4))
# afw_display = afwDisplay.Display(1)
# afw_display.scale('asinh', 'zscale')
# afw_display.mtv(my_deepCoadd.image)
# plt.gca().axis('off')
Option: learn more about the deepCoadd metadata, such as bounding box, corners, and the World Coordinate System (WCS), by uncommenting and executing the cell below.
It is not necessary to know the bounding box for a deepCoadd in order to find all of the calexps that were used to assemble it, this is simply a demonstration for the learner.
# my_deepCoadd_bbox = butler.get('deepCoadd.bbox', dataId=my_dataId)
# print('bbox')
# print(my_deepCoadd_bbox.beginX, my_deepCoadd_bbox.beginY,
#       my_deepCoadd_bbox.endX, my_deepCoadd_bbox.endY)

# print('')
# print('corners')
# print(my_deepCoadd_bbox.getCorners())

# print('')
# print('wcs')
# my_deepCoadd_wcs = butler.get('deepCoadd.wcs', dataId=my_dataId)
# print(my_deepCoadd_wcs)

# del my_deepCoadd_bbox, my_deepCoadd_wcs
my_coadd_inputs = my_deepCoadd.getInfo().getCoaddInputs()
The length of this table, 161, indicates that 161 separate visits contributed to this deepCoadd.
len(my_coadd_inputs.visits)
161
Option: display the information for the deepCoadd inputs as an astropy table.
# my_coadd_inputs.visits.asAstropy()
Option: list the id of each of the deepCoadd input visits.
# my_coadd_visits = my_coadd_inputs.visits['id']
# my_coadd_visits
Notice: The
visitIdis a unique identifier for a visit, which is a full-focal plane exposure obtained at a specific time, at specific sky coordinates, in one filter. ThevisitIDdoes not also uniquely identify the CCD (detector): that is called accdVisitId.
First, get the entire visit table.
visitTableRef = list(butler.registry.queryDatasets('visitTable'))
visitTable = butler.get(visitTableRef[0])
Option: display the contents of the entire visitTable.
# visitTable
Retrieve the Modified Julian Dates (MJDs; expMidptMJD) of our deepCoadd's input visits.
The fact that the id column for both the my_coadd_inputs.visits table and the visitTable is the visit number makes doing this a simple single line of code.
my_coadd_visits_mjds = visitTable.loc[my_coadd_inputs.visits['id']]['expMidptMJD']
This list of MJDs has 161 elements, for the 161 separate visits contributed to this deepCoadd.
len(my_coadd_visits_mjds)
161
For the sake of the adopted science use case, the supernova exploded on MJD = 60960.
As a user, we want to stack images first from the month before to look for a faint precursor, and then maybe also the month before that.
Thus, we identify input visits in two date ranges:
Window1: 60925 to 60955 (the month before)
Window2: 60885 to 60922 (the month before that)
Window1_start = 60925
Window1_end = 60955

Window2_start = 60885
Window2_end = 60922

fig, ax = plt.subplots(2, figsize=(10, 8))

ax[0].axvline(60960, lw=1, ls='solid', color='black')
ax[0].hist(my_coadd_visits_mjds, bins=150, color='dodgerblue')
ax[0].set_xlabel('MJD')
ax[0].set_ylabel('Number of Visits')
ax[0].axvline(Window1_start, ls='dotted', color='firebrick')
ax[0].axvline(Window1_end, ls='dotted', color='firebrick')
ax[0].axvline(Window2_start, ls='dashed', color='darkorange')
ax[0].axvline(Window2_end, ls='dashed', color='darkorange')

ax[1].axvline(60960, lw=1, ls='solid', color='black')
ax[1].text(60960.5, 7.5, 'SN', color='black')
ax[1].hist(my_coadd_visits_mjds, bins=150, color='dodgerblue')
ax[1].set_xlabel('MJD')
ax[1].set_ylabel('Number of Visits')
ax[1].set_xlim([60880, 60985])
ax[1].axvline(Window1_start, ls='dotted', color='firebrick')
ax[1].axvline(Window1_end, ls='dotted', color='firebrick')
ax[1].text(Window1_start+1, 7.5, 'Window1', color='firebrick')
ax[1].axvline(Window2_start, ls='dashed', color='darkorange')
ax[1].axvline(Window2_end, ls='dashed', color='darkorange')
ax[1].text(Window2_start+1, 7.5, 'Window2', color='darkorange')

plt.show()

There are six visits in Window1, and ten in the earlier Window2.
Put the list of visits for Window1 into a string, formatted as a tuple, for use in a query later on. ("Formatted as a tuple" means within round brackets and separated by commas).
Notice: Changes to the
SimplePipelineExecutorare planned so as to remove the need for users to reformatvisitIdlists as strings.
my_range = np.array((my_coadd_visits_mjds > Window1_start)
                    & (my_coadd_visits_mjds < Window1_end))
my_visits = my_coadd_inputs.visits[my_range]
my_visits_tupleString = "("+",".join(my_visits['id'].astype(str))+")"
print(my_visits_tupleString)
(919515,924057,924085,924086,929477,930353)
Use the convention u/<Your User Name>/<Collection Identifier> to set up a new butler output collection for this tutorial.
For <Collection Identifier>, for the first test of this notebook creating a custom coadd for Window1, "custom_coadd_window1_test1".
The new deepCoadd generated by this tutorial will be stored in the butler, just like the DP0 data sets generated by Rubin staff.
Everything stored in the butler is visible to all users.
All users should feel free to go ahead and build up a bunch of processed data in the butler. Rubin staff will reach out if this ever gets to be "too much".
Warning: For DP0, the butler is a shared data repository, and everything stored in it is accessible to everyone. For DP0, there are no safeguards preventing users from deleting other people's data. Thus, for DP0, we are not teaching users how to delete anything from the butler.
my_username = getpass.getuser()
print(my_username)
melissagraham
my_collection_identifier = 'custom_coadd_window1_test2'
print(my_collection_identifier)
custom_coadd_window1_test2
my_outputCollection = 'u/'+my_username+'/'+my_collection_identifier
print('Name of new butler collection for my output: ', my_outputCollection)
Name of new butler collection for my output: u/melissagraham/custom_coadd_window1_test2
Check if this output collection already exists.
If nothing is printed below this cell, the output collection does not already exist.
for c in sorted(butler.registry.queryCollections()):
    if c.find(my_outputCollection) > -1:
        print(c)
Delete the current butler. In the next section, a "simple butler" is created and used thereafter.
del butler
Set up a simple butler to use with the simple pipeline executor that is made in Section 3.6 below.
This simple butler defines the input collection that contains the images which will be used to create the custom coadd, 2.2i/runs/DP0.2, and also the output collection that will contain the custom deepCoadd, my_outputCollection, as defined in Section 3.1 above.
simpleButler = SimplePipelineExecutor.prep_butler('dp02-direct',
                                                  inputs=['2.2i/runs/DP0.2'],
                                                  output=my_outputCollection)
Below, check that the newly created output collection is first in the list.
Notice: A run timestamp has been added to
my_outputCollectionas additional information for users.
Warning: If you want to make multiple custom coadds, you should identify each with a new output collection name, such as
custom_coadd_window1_test2orcustom_coadd_window2_test1, and so on.
Note that re-executing Section 3 with the same output collection name will produce results with a new run timestamp, but the butler always retrieves data from the most recent timestamp for a given collection. Not setting a new output collection name for a new custom coadd is essentially like "overwriting" your results in the butler. It is not recommended to work that way, but to bookkeep using output collection names.
simpleButler.registry.getCollectionChain(my_outputCollection)
CollectionSearch(('u/melissagraham/custom_coadd_window1_test2/20241021T182310Z', '2.2i/runs/DP0.2'))
Option: check the output collection run names that currently exist.
# for c in sorted(simpleButler.registry.queryCollections(my_outputCollection+'*')):
#     print('Found: ', c)
In order to combine the identified visits into a new deepCoadd, two steps of the larger Data Release Pipeline (DRP) must be included: makeWarp and assembleCoadd.
Although warped images are created during processing, they are not stored long-term because they take up a lot of space and because they can be easily recreated when needed.
For more information, review the relevant documentation about creating a pipeline or the assembleCoadd task.
The from_uri method.
The following method for creating the assembleCoaddPipeline task in a notebook (i.e., using the from_uri function and passing a file path) is not intuitive, but is preferred because it gives the user all of the configuration settings for the instrument automatically, and because it most closely replicates the command-line syntax.
A URI is a uniform resource identifier, and as seen below it can take both a file path and additional information: in this case, the additional information is the processing steps that we wish to use, which are defined in the file.
The "yaml" file.
yaml is a human-readable data-serialization language. It is commonly used for configuration files and in applications where data are being stored or transmitted.
All the DP0 tasks are listed in the DPO data release production pipeline definition yaml.
To see this full list of tasks, first open a new terminal (click the blue + button at upper left and then select terminal).
Then create a Rubin Observatory environment, and render the pipeline yaml content via the pipetask build command:
setup lsst_distrib
pipetask build -p $DRP_PIPE_DIR/pipelines/LSSTCam-imSim/DRP-test-med-1.yaml --show pipeline
You will see quite a lot of yaml output as a result of this command. For more information about pipetask build, please check out the command line version of this custom coadd tutorial. Note that, witihin the pipetask build yaml output, the ordering of tasks within a given step may be randomized.
You can see an abbreviated version of the DP0 pipeline definition yaml by isolating "step3" as follows, where "step3" refers to coaddition:
pipetask build -p $DRP_PIPE_DIR/pipelines/LSSTCam-imSim/DRP-test-med-1.yaml#step3 --show pipeline
The above command assumes that you've already run setup lsst_distrib to set up the LSST software stack environment.
First create my_uri, a string that defines which parts of the Data Release Pipeline (DRP) will be included.
To create a custom coadd, only two steps need to be rerun: makeWarp and assembleCoadd.
In the file $DRP_PIPE_DIR/pipelines/LSSTCam-imSim/DRP-test-med-1.yaml, you will find these defined as the first two sub-steps of "step3", and that they are usually followed by the sub-step detection.
However, we omit that sub-step and do source detection and measurement in the next tutorial notebook in this series, 09b_Custom_Coadd_Sources.ipynb.
yaml_file = '$DRP_PIPE_DIR/pipelines/LSSTCam-imSim/DRP-test-med-1.yaml'
steps = 'makeWarp,assembleCoadd'
my_uri = yaml_file + '#' + steps
print(my_uri)
$DRP_PIPE_DIR/pipelines/LSSTCam-imSim/DRP-test-med-1.yaml#makeWarp,assembleCoadd
Next create a pipeline including just makeWarp and assembleCoadd steps, and call it assembleCoaddPipeline.
assembleCoaddPipeline = Pipeline.from_uri(my_uri)
There is only one configuration that must be set, and it is to clarify to the pipeline that it does not need to redo a final image characterization step. Currently, this configuration is only needed due to a version mismatch: the DP0.2 data sets were processed with Version 23 of the LSST Science Pipelines, whereas this notebook uses the version "Weekly 2022_40".
This configuration might not be needed in the future, and in general, users of this tutorial do not need to worry about other configuration changes. Just as an FYI, configurations can be set using addConfigOverride(<taskName>, <configName>, <configValue>).
Section 4.2.5. shows how to view the configurations that were used for a given run.
assembleCoaddPipeline.addConfigOverride('makeWarp', 'doApplyFinalizedPsf', False)
assembleCoaddPipeline.addConfigOverride('makeWarp',
                                        'connections.visitSummary',
                                        "visitSummary")
QuantumGraph¶Before actually deploying the custom coaddition, let’s take a moment to inspect the QuantumGraph of the processing to be run. The QuantumGraph is a tool used by the LSST Science Pipelines to break a large processing into relatively “bite-sized” quanta and arrange these quanta into a sequence such that all inputs needed by a given quantum are available for the execution of that quantum. In the present case, you will not be doing an especially large processing, but for production deployments it makes sense to inspect and validate the QuantumGraph before proceeding straight to full-scale processing launch. The image below provides a visualization of the custom coadd processing's QuantumGraph.
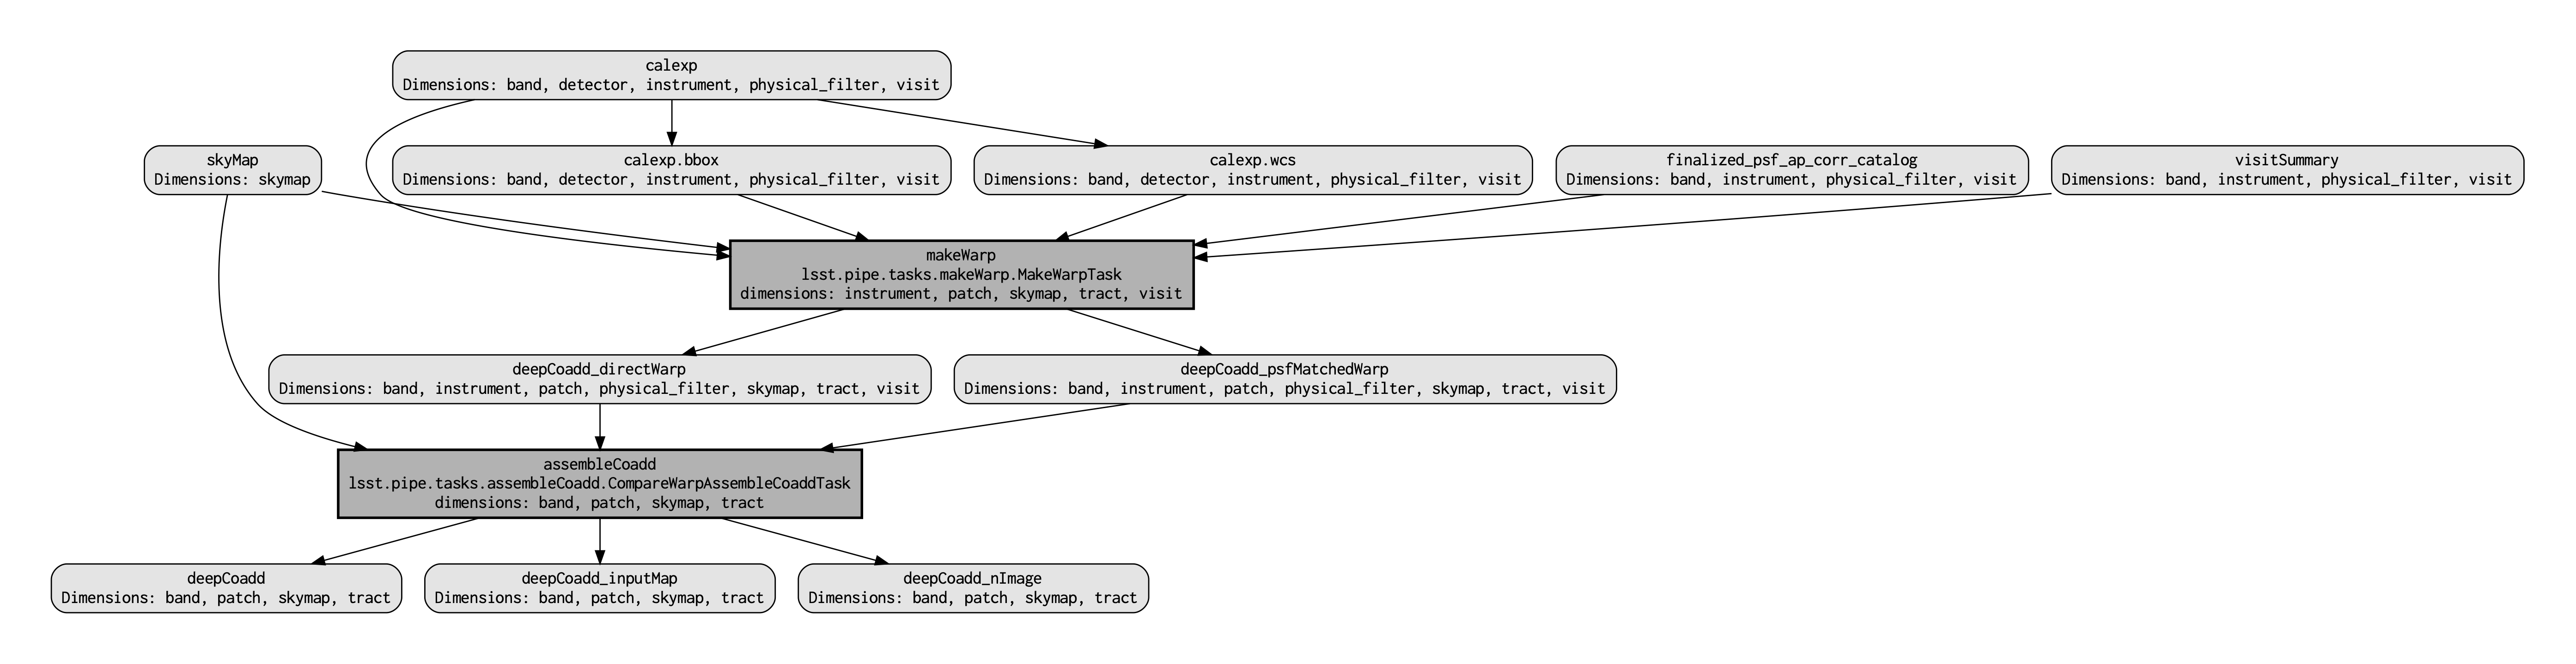
Light gray rectangles with rounded corners represent data, whereas darker gray rectangles with sharp corners represent pipeline tasks. The arrows connecting the data and tasks illustrate the data processing flow. The data processing starts at the top, with the calexp calibrated single-exposure images (also known as Processed Visit Images; PVIs). The makeWarp task is applied to generate reprojected "warp" images from the various input calexp images, and finally the assembleCoadd task combines the warps into deepCoadd coadded products (light gray boxes along the bottom row).
Option: recreate the above QuantumGraph visualization yourself. Note that running the following optional commands will create two files, custom_coadd_qgraph.dot and custom_coadd_qgraph.png, in your RSP home directory.
# from lsst.ctrl.mpexec import pipeline2dot
# pipeline2dot(assembleCoaddPipeline, '/home/' + getpass.getuser() + '/custom_coadd_qgraph.dot')

# ! dot -Tpng /home/$USER/custom_coadd_qgraph.dot > /home/$USER/custom_coadd_qgraph.png
Above, the visits to be recombined were stored in my_visits_tupleString.
Below, the full query string is built to include the patch being recreated.
queryString = f"tract = {my_tract} AND patch = {my_patch} AND " + \
              f"visit in {my_visits_tupleString} AND skymap = 'DC2'"

print(queryString)
tract = 4431 AND patch = 17 AND visit in (919515,924057,924085,924086,929477,930353) AND skymap = 'DC2'
The Simple Pipeline Executor is a simple, high-level executor for pipelines that is primarily used for unit tests and small-scale integration of PipelineTask classes. It is appropriate to use in this case, where we are doing small-scale pipeline integration, in this case, of the makeWarp and assembleCoaddPipeline tasks only.
Learn more about the Simple Pipeline Executor.
# SimplePipelineExecutor.from_pipeline?
Set up the Simple Pipeline Executor. This step can take up to 15 minutes.
spe = SimplePipelineExecutor.from_pipeline(assembleCoaddPipeline,
                                           where=queryString,
                                           butler=simpleButler)
Option: Further explore the QuantumGraph via your SimplePipelineExecutor object. To see a pop-up window of QuantumGraph-related methods/attributes accessible via your SimplePipelineExecutor, put your cursor after the period and press the tab key.
# spe.quantum_graph.
Run the pipeline.
There will be a lot of standard output. Alt-click to the left of the cell (or control-click for Macs) and choose "Enable Scrolling for Outputs" to condense all of the output into a scrollable inset window.
This takes about 20 minutes to coadd the 6 visits of Window1.
Notice: Recall from Section 3.2 that the Butler will not overwrite existing data.
If you've already executed the cell below, and then you attempt to re-execute it without first re-executing the cell in Section 3.2 that instantiates the simpleButler with an output collection that has a unique timestamp, an error message will be returned.
quanta = spe.run()
lsst.makeWarp.select INFO: Selecting calexp {instrument: 'LSSTCam-imSim', detector: 110, visit: 919515, ...}
lsst.makeWarp.select INFO: Selecting calexp {instrument: 'LSSTCam-imSim', detector: 113, visit: 919515, ...}
lsst.makeWarp.select INFO: Selecting calexp {instrument: 'LSSTCam-imSim', detector: 116, visit: 919515, ...}
lsst.makeWarp INFO: Processing calexp 1 of 3 for this Warp: id={instrument: 'LSSTCam-imSim', detector: 110, visit: 919515, ...}
lsst.makeWarp.warpAndPsfMatch.psfMatch INFO: compute Psf-matching kernel
lsst.makeWarp.warpAndPsfMatch.psfMatch INFO: Adjusted dimensions of reference PSF model from (23, 23) to (57, 57)
lsst.ip.diffim.generateAlardLuptonBasisList INFO: PSF sigmas are not available or scaling by fwhm disabled, falling back to config values
lsst.makeWarp.warpAndPsfMatch.psfMatch INFO: Psf-match science exposure to reference
lsst.makeWarp.warpAndPsfMatch.psfMatch INFO: done
lsst.makeWarp INFO: Processing calexp 2 of 3 for this Warp: id={instrument: 'LSSTCam-imSim', detector: 113, visit: 919515, ...}
lsst.makeWarp.warpAndPsfMatch.psfMatch INFO: compute Psf-matching kernel
lsst.makeWarp.warpAndPsfMatch.psfMatch INFO: Adjusted dimensions of reference PSF model from (23, 23) to (57, 57)
lsst.ip.diffim.generateAlardLuptonBasisList INFO: PSF sigmas are not available or scaling by fwhm disabled, falling back to config values
lsst.makeWarp.warpAndPsfMatch.psfMatch INFO: Psf-match science exposure to reference
lsst.makeWarp.warpAndPsfMatch.psfMatch INFO: done
lsst.makeWarp INFO: Processing calexp 3 of 3 for this Warp: id={instrument: 'LSSTCam-imSim', detector: 116, visit: 919515, ...}
lsst.makeWarp.warpAndPsfMatch.psfMatch INFO: compute Psf-matching kernel
lsst.makeWarp.warpAndPsfMatch.psfMatch INFO: Adjusted dimensions of reference PSF model from (23, 23) to (57, 57)
lsst.ip.diffim.generateAlardLuptonBasisList INFO: PSF sigmas are not available or scaling by fwhm disabled, falling back to config values
lsst.makeWarp.warpAndPsfMatch.psfMatch INFO: Psf-match science exposure to reference
lsst.makeWarp.warpAndPsfMatch.psfMatch INFO: done
lsst.makeWarp INFO: directWarp has 8982709 good pixels (50.9%)
lsst.makeWarp INFO: psfMatchedWarp has 8856818 good pixels (50.2%)
lsst.ctrl.mpexec.singleQuantumExecutor INFO: Execution of task 'makeWarp' on quantum {instrument: 'LSSTCam-imSim', skymap: 'DC2', tract: 4431, patch: 17, visit: 919515, ...} took 77.212 seconds
lsst.ctrl.mpexec.singleQuantumExecutor INFO: Log records could not be stored in this butler because the datastore can not ingest files, empty record list is stored instead.
lsst.makeWarp.select INFO: Selecting calexp {instrument: 'LSSTCam-imSim', detector: 139, visit: 924086, ...}
lsst.makeWarp.select INFO: Selecting calexp {instrument: 'LSSTCam-imSim', detector: 140, visit: 924086, ...}
lsst.makeWarp.select INFO: Selecting calexp {instrument: 'LSSTCam-imSim', detector: 141, visit: 924086, ...}
lsst.makeWarp.select INFO: Selecting calexp {instrument: 'LSSTCam-imSim', detector: 142, visit: 924086, ...}
lsst.makeWarp.select INFO: Selecting calexp {instrument: 'LSSTCam-imSim', detector: 143, visit: 924086, ...}
lsst.makeWarp INFO: Processing calexp 1 of 5 for this Warp: id={instrument: 'LSSTCam-imSim', detector: 139, visit: 924086, ...}
lsst.makeWarp.warpAndPsfMatch.psfMatch INFO: compute Psf-matching kernel
lsst.makeWarp.warpAndPsfMatch.psfMatch INFO: Adjusted dimensions of reference PSF model from (23, 23) to (57, 57)
lsst.ip.diffim.generateAlardLuptonBasisList INFO: PSF sigmas are not available or scaling by fwhm disabled, falling back to config values
lsst.makeWarp.warpAndPsfMatch.psfMatch INFO: Psf-match science exposure to reference
lsst.makeWarp.warpAndPsfMatch.psfMatch INFO: done
lsst.makeWarp INFO: Processing calexp 2 of 5 for this Warp: id={instrument: 'LSSTCam-imSim', detector: 140, visit: 924086, ...}
lsst.makeWarp.warpAndPsfMatch.psfMatch INFO: compute Psf-matching kernel
lsst.makeWarp.warpAndPsfMatch.psfMatch INFO: Adjusted dimensions of reference PSF model from (23, 23) to (57, 57)
lsst.ip.diffim.generateAlardLuptonBasisList INFO: PSF sigmas are not available or scaling by fwhm disabled, falling back to config values
lsst.makeWarp.warpAndPsfMatch.psfMatch INFO: Psf-match science exposure to reference
lsst.makeWarp.warpAndPsfMatch.psfMatch INFO: done
lsst.makeWarp INFO: Processing calexp 3 of 5 for this Warp: id={instrument: 'LSSTCam-imSim', detector: 141, visit: 924086, ...}
lsst.makeWarp.warpAndPsfMatch.psfMatch INFO: compute Psf-matching kernel
lsst.makeWarp.warpAndPsfMatch.psfMatch INFO: Adjusted dimensions of reference PSF model from (23, 23) to (57, 57)
lsst.ip.diffim.generateAlardLuptonBasisList INFO: PSF sigmas are not available or scaling by fwhm disabled, falling back to config values
lsst.makeWarp.warpAndPsfMatch.psfMatch INFO: Psf-match science exposure to reference
lsst.makeWarp.warpAndPsfMatch.psfMatch INFO: done
lsst.makeWarp INFO: Processing calexp 4 of 5 for this Warp: id={instrument: 'LSSTCam-imSim', detector: 142, visit: 924086, ...}
lsst.makeWarp.warpAndPsfMatch.psfMatch INFO: compute Psf-matching kernel
lsst.makeWarp.warpAndPsfMatch.psfMatch INFO: Adjusted dimensions of reference PSF model from (23, 23) to (57, 57)
lsst.ip.diffim.generateAlardLuptonBasisList INFO: PSF sigmas are not available or scaling by fwhm disabled, falling back to config values
lsst.makeWarp.warpAndPsfMatch.psfMatch INFO: Psf-match science exposure to reference
lsst.makeWarp.warpAndPsfMatch.psfMatch INFO: done
lsst.makeWarp INFO: Processing calexp 5 of 5 for this Warp: id={instrument: 'LSSTCam-imSim', detector: 143, visit: 924086, ...}
lsst.makeWarp.warpAndPsfMatch.psfMatch INFO: compute Psf-matching kernel
lsst.makeWarp.warpAndPsfMatch.psfMatch INFO: Adjusted dimensions of reference PSF model from (23, 23) to (57, 57)
lsst.ip.diffim.generateAlardLuptonBasisList INFO: PSF sigmas are not available or scaling by fwhm disabled, falling back to config values
lsst.makeWarp.warpAndPsfMatch.psfMatch INFO: Psf-match science exposure to reference
lsst.makeWarp.warpAndPsfMatch.psfMatch INFO: done
lsst.makeWarp INFO: directWarp has 16136708 good pixels (91.5%)
lsst.makeWarp INFO: psfMatchedWarp has 15929402 good pixels (90.3%)
lsst.ctrl.mpexec.singleQuantumExecutor INFO: Execution of task 'makeWarp' on quantum {instrument: 'LSSTCam-imSim', skymap: 'DC2', tract: 4431, patch: 17, visit: 924086, ...} took 134.562 seconds
lsst.ctrl.mpexec.singleQuantumExecutor INFO: Log records could not be stored in this butler because the datastore can not ingest files, empty record list is stored instead.
lsst.makeWarp.select INFO: Selecting calexp {instrument: 'LSSTCam-imSim', detector: 165, visit: 930353, ...}
lsst.makeWarp.select INFO: Selecting calexp {instrument: 'LSSTCam-imSim', detector: 166, visit: 930353, ...}
lsst.makeWarp.select INFO: Selecting calexp {instrument: 'LSSTCam-imSim', detector: 168, visit: 930353, ...}
lsst.makeWarp.select INFO: Selecting calexp {instrument: 'LSSTCam-imSim', detector: 169, visit: 930353, ...}
lsst.makeWarp INFO: Processing calexp 1 of 4 for this Warp: id={instrument: 'LSSTCam-imSim', detector: 165, visit: 930353, ...}
lsst.makeWarp.warpAndPsfMatch.psfMatch INFO: compute Psf-matching kernel
lsst.makeWarp.warpAndPsfMatch.psfMatch INFO: Adjusted dimensions of reference PSF model from (23, 23) to (57, 57)
lsst.ip.diffim.generateAlardLuptonBasisList INFO: PSF sigmas are not available or scaling by fwhm disabled, falling back to config values
lsst.makeWarp.warpAndPsfMatch.psfMatch INFO: Psf-match science exposure to reference
lsst.makeWarp.warpAndPsfMatch.psfMatch INFO: done
lsst.makeWarp INFO: Processing calexp 2 of 4 for this Warp: id={instrument: 'LSSTCam-imSim', detector: 166, visit: 930353, ...}
lsst.makeWarp.warpAndPsfMatch.psfMatch INFO: compute Psf-matching kernel
lsst.makeWarp.warpAndPsfMatch.psfMatch INFO: Adjusted dimensions of reference PSF model from (23, 23) to (57, 57)
lsst.ip.diffim.generateAlardLuptonBasisList INFO: PSF sigmas are not available or scaling by fwhm disabled, falling back to config values
lsst.makeWarp.warpAndPsfMatch.psfMatch INFO: Psf-match science exposure to reference
lsst.makeWarp.warpAndPsfMatch.psfMatch INFO: done
lsst.makeWarp INFO: Processing calexp 3 of 4 for this Warp: id={instrument: 'LSSTCam-imSim', detector: 168, visit: 930353, ...}
lsst.makeWarp.warpAndPsfMatch.psfMatch INFO: compute Psf-matching kernel
lsst.makeWarp.warpAndPsfMatch.psfMatch INFO: Adjusted dimensions of reference PSF model from (23, 23) to (57, 57)
lsst.ip.diffim.generateAlardLuptonBasisList INFO: PSF sigmas are not available or scaling by fwhm disabled, falling back to config values
lsst.makeWarp.warpAndPsfMatch.psfMatch INFO: Psf-match science exposure to reference
lsst.makeWarp.warpAndPsfMatch.psfMatch INFO: done
lsst.makeWarp INFO: Processing calexp 4 of 4 for this Warp: id={instrument: 'LSSTCam-imSim', detector: 169, visit: 930353, ...}
lsst.makeWarp.warpAndPsfMatch.psfMatch INFO: compute Psf-matching kernel
lsst.makeWarp.warpAndPsfMatch.psfMatch INFO: Adjusted dimensions of reference PSF model from (23, 23) to (57, 57)
lsst.ip.diffim.generateAlardLuptonBasisList INFO: PSF sigmas are not available or scaling by fwhm disabled, falling back to config values
lsst.makeWarp.warpAndPsfMatch.psfMatch INFO: Psf-match science exposure to reference
lsst.makeWarp.warpAndPsfMatch.psfMatch INFO: done
lsst.makeWarp INFO: directWarp has 16076133 good pixels (91.1%)
lsst.makeWarp INFO: psfMatchedWarp has 15873200 good pixels (90.0%)
lsst.ctrl.mpexec.singleQuantumExecutor INFO: Execution of task 'makeWarp' on quantum {instrument: 'LSSTCam-imSim', skymap: 'DC2', tract: 4431, patch: 17, visit: 930353, ...} took 124.350 seconds
lsst.ctrl.mpexec.singleQuantumExecutor INFO: Log records could not be stored in this butler because the datastore can not ingest files, empty record list is stored instead.
lsst.makeWarp.select INFO: Selecting calexp {instrument: 'LSSTCam-imSim', detector: 52, visit: 929477, ...}
lsst.makeWarp.select INFO: Selecting calexp {instrument: 'LSSTCam-imSim', detector: 90, visit: 929477, ...}
lsst.makeWarp.select INFO: Selecting calexp {instrument: 'LSSTCam-imSim', detector: 91, visit: 929477, ...}
lsst.makeWarp.select INFO: Selecting calexp {instrument: 'LSSTCam-imSim', detector: 92, visit: 929477, ...}
lsst.makeWarp.select INFO: Selecting calexp {instrument: 'LSSTCam-imSim', detector: 94, visit: 929477, ...}
lsst.makeWarp INFO: Processing calexp 1 of 5 for this Warp: id={instrument: 'LSSTCam-imSim', detector: 52, visit: 929477, ...}
lsst.makeWarp.warpAndPsfMatch.psfMatch INFO: compute Psf-matching kernel
lsst.makeWarp.warpAndPsfMatch.psfMatch INFO: Adjusted dimensions of reference PSF model from (23, 23) to (55, 55)
lsst.ip.diffim.generateAlardLuptonBasisList INFO: PSF sigmas are not available or scaling by fwhm disabled, falling back to config values
lsst.makeWarp.warpAndPsfMatch.psfMatch INFO: Psf-match science exposure to reference
lsst.makeWarp.warpAndPsfMatch.psfMatch INFO: done
lsst.makeWarp INFO: Processing calexp 2 of 5 for this Warp: id={instrument: 'LSSTCam-imSim', detector: 90, visit: 929477, ...}
lsst.makeWarp.warpAndPsfMatch.psfMatch INFO: compute Psf-matching kernel
lsst.makeWarp.warpAndPsfMatch.psfMatch INFO: Adjusted dimensions of reference PSF model from (23, 23) to (55, 55)
lsst.ip.diffim.generateAlardLuptonBasisList INFO: PSF sigmas are not available or scaling by fwhm disabled, falling back to config values
lsst.makeWarp.warpAndPsfMatch.psfMatch INFO: Psf-match science exposure to reference
lsst.makeWarp.warpAndPsfMatch.psfMatch INFO: done
lsst.makeWarp INFO: Processing calexp 3 of 5 for this Warp: id={instrument: 'LSSTCam-imSim', detector: 91, visit: 929477, ...}
lsst.makeWarp.warpAndPsfMatch.psfMatch INFO: compute Psf-matching kernel
lsst.makeWarp.warpAndPsfMatch.psfMatch INFO: Adjusted dimensions of reference PSF model from (23, 23) to (55, 55)
lsst.ip.diffim.generateAlardLuptonBasisList INFO: PSF sigmas are not available or scaling by fwhm disabled, falling back to config values
lsst.makeWarp.warpAndPsfMatch.psfMatch INFO: Psf-match science exposure to reference
lsst.makeWarp.warpAndPsfMatch.psfMatch INFO: done
lsst.makeWarp INFO: Processing calexp 4 of 5 for this Warp: id={instrument: 'LSSTCam-imSim', detector: 92, visit: 929477, ...}
lsst.makeWarp.warpAndPsfMatch.psfMatch INFO: compute Psf-matching kernel
lsst.makeWarp.warpAndPsfMatch.psfMatch INFO: Adjusted dimensions of reference PSF model from (23, 23) to (55, 55)
lsst.ip.diffim.generateAlardLuptonBasisList INFO: PSF sigmas are not available or scaling by fwhm disabled, falling back to config values
lsst.makeWarp.warpAndPsfMatch.psfMatch INFO: Psf-match science exposure to reference
lsst.makeWarp.warpAndPsfMatch.psfMatch INFO: done
lsst.makeWarp INFO: Processing calexp 5 of 5 for this Warp: id={instrument: 'LSSTCam-imSim', detector: 94, visit: 929477, ...}
lsst.makeWarp.warpAndPsfMatch.psfMatch INFO: compute Psf-matching kernel
lsst.makeWarp.warpAndPsfMatch.psfMatch INFO: Adjusted dimensions of reference PSF model from (23, 23) to (55, 55)
lsst.ip.diffim.generateAlardLuptonBasisList INFO: PSF sigmas are not available or scaling by fwhm disabled, falling back to config values
lsst.makeWarp.warpAndPsfMatch.psfMatch INFO: Psf-match science exposure to reference
lsst.makeWarp.warpAndPsfMatch.psfMatch INFO: done
lsst.makeWarp INFO: directWarp has 16280498 good pixels (92.3%)
lsst.makeWarp INFO: psfMatchedWarp has 16091293 good pixels (91.2%)
lsst.ctrl.mpexec.singleQuantumExecutor INFO: Execution of task 'makeWarp' on quantum {instrument: 'LSSTCam-imSim', skymap: 'DC2', tract: 4431, patch: 17, visit: 929477, ...} took 132.537 seconds
lsst.ctrl.mpexec.singleQuantumExecutor INFO: Log records could not be stored in this butler because the datastore can not ingest files, empty record list is stored instead.
lsst.makeWarp.select INFO: Selecting calexp {instrument: 'LSSTCam-imSim', detector: 178, visit: 924085, ...}
lsst.makeWarp INFO: Processing calexp 1 of 1 for this Warp: id={instrument: 'LSSTCam-imSim', detector: 178, visit: 924085, ...}
lsst.makeWarp.warpAndPsfMatch.psfMatch INFO: compute Psf-matching kernel
lsst.makeWarp.warpAndPsfMatch.psfMatch INFO: Adjusted dimensions of reference PSF model from (23, 23) to (57, 57)
lsst.ip.diffim.generateAlardLuptonBasisList INFO: PSF sigmas are not available or scaling by fwhm disabled, falling back to config values
lsst.makeWarp.warpAndPsfMatch.psfMatch INFO: Psf-match science exposure to reference
lsst.makeWarp.warpAndPsfMatch.psfMatch INFO: done
lsst.makeWarp INFO: directWarp has 831332 good pixels (4.7%)
lsst.makeWarp INFO: psfMatchedWarp has 805735 good pixels (4.6%)
lsst.ctrl.mpexec.singleQuantumExecutor INFO: Execution of task 'makeWarp' on quantum {instrument: 'LSSTCam-imSim', skymap: 'DC2', tract: 4431, patch: 17, visit: 924085, ...} took 23.827 seconds
lsst.ctrl.mpexec.singleQuantumExecutor INFO: Log records could not be stored in this butler because the datastore can not ingest files, empty record list is stored instead.
lsst.makeWarp.select INFO: Selecting calexp {instrument: 'LSSTCam-imSim', detector: 30, visit: 924057, ...}
lsst.makeWarp.select INFO: Selecting calexp {instrument: 'LSSTCam-imSim', detector: 31, visit: 924057, ...}
lsst.makeWarp.select INFO: Selecting calexp {instrument: 'LSSTCam-imSim', detector: 33, visit: 924057, ...}
lsst.makeWarp.select INFO: Selecting calexp {instrument: 'LSSTCam-imSim', detector: 34, visit: 924057, ...}
lsst.makeWarp INFO: Processing calexp 1 of 4 for this Warp: id={instrument: 'LSSTCam-imSim', detector: 30, visit: 924057, ...}
lsst.makeWarp.warpAndPsfMatch.psfMatch INFO: compute Psf-matching kernel
lsst.makeWarp.warpAndPsfMatch.psfMatch INFO: Adjusted dimensions of reference PSF model from (23, 23) to (57, 57)
lsst.ip.diffim.generateAlardLuptonBasisList INFO: PSF sigmas are not available or scaling by fwhm disabled, falling back to config values
lsst.makeWarp.warpAndPsfMatch.psfMatch INFO: Psf-match science exposure to reference
lsst.makeWarp.warpAndPsfMatch.psfMatch INFO: done
lsst.makeWarp INFO: Processing calexp 2 of 4 for this Warp: id={instrument: 'LSSTCam-imSim', detector: 31, visit: 924057, ...}
lsst.makeWarp.warpAndPsfMatch.psfMatch INFO: compute Psf-matching kernel
lsst.makeWarp.warpAndPsfMatch.psfMatch INFO: Adjusted dimensions of reference PSF model from (23, 23) to (57, 57)
lsst.ip.diffim.generateAlardLuptonBasisList INFO: PSF sigmas are not available or scaling by fwhm disabled, falling back to config values
lsst.makeWarp.warpAndPsfMatch.psfMatch INFO: Psf-match science exposure to reference
lsst.makeWarp.warpAndPsfMatch.psfMatch INFO: done
lsst.makeWarp INFO: Processing calexp 3 of 4 for this Warp: id={instrument: 'LSSTCam-imSim', detector: 33, visit: 924057, ...}
lsst.makeWarp.warpAndPsfMatch.psfMatch INFO: compute Psf-matching kernel
lsst.makeWarp.warpAndPsfMatch.psfMatch INFO: Adjusted dimensions of reference PSF model from (23, 23) to (57, 57)
lsst.ip.diffim.generateAlardLuptonBasisList INFO: PSF sigmas are not available or scaling by fwhm disabled, falling back to config values
lsst.makeWarp.warpAndPsfMatch.psfMatch INFO: Psf-match science exposure to reference
lsst.makeWarp.warpAndPsfMatch.psfMatch INFO: done
lsst.makeWarp INFO: Processing calexp 4 of 4 for this Warp: id={instrument: 'LSSTCam-imSim', detector: 34, visit: 924057, ...}
lsst.makeWarp.warpAndPsfMatch.psfMatch INFO: compute Psf-matching kernel
lsst.makeWarp.warpAndPsfMatch.psfMatch INFO: Adjusted dimensions of reference PSF model from (23, 23) to (57, 57)
lsst.ip.diffim.generateAlardLuptonBasisList INFO: PSF sigmas are not available or scaling by fwhm disabled, falling back to config values
lsst.makeWarp.warpAndPsfMatch.psfMatch INFO: Psf-match science exposure to reference
lsst.makeWarp.warpAndPsfMatch.psfMatch INFO: done
lsst.makeWarp INFO: directWarp has 16098179 good pixels (91.3%)
lsst.makeWarp INFO: psfMatchedWarp has 15894357 good pixels (90.1%)
lsst.ctrl.mpexec.singleQuantumExecutor INFO: Execution of task 'makeWarp' on quantum {instrument: 'LSSTCam-imSim', skymap: 'DC2', tract: 4431, patch: 17, visit: 924057, ...} took 122.323 seconds
lsst.ctrl.mpexec.singleQuantumExecutor INFO: Log records could not be stored in this butler because the datastore can not ingest files, empty record list is stored instead.
lsst.assembleCoadd INFO: Weight of deepCoadd_directWarp {instrument: 'LSSTCam-imSim', skymap: 'DC2', tract: 4431, patch: 17, visit: 924057, ...} = 4.384
lsst.assembleCoadd INFO: Weight of deepCoadd_directWarp {instrument: 'LSSTCam-imSim', skymap: 'DC2', tract: 4431, patch: 17, visit: 929477, ...} = 4.051
lsst.assembleCoadd INFO: Weight of deepCoadd_directWarp {instrument: 'LSSTCam-imSim', skymap: 'DC2', tract: 4431, patch: 17, visit: 919515, ...} = 3.466
lsst.assembleCoadd INFO: Weight of deepCoadd_directWarp {instrument: 'LSSTCam-imSim', skymap: 'DC2', tract: 4431, patch: 17, visit: 924086, ...} = 4.550
lsst.assembleCoadd INFO: Weight of deepCoadd_directWarp {instrument: 'LSSTCam-imSim', skymap: 'DC2', tract: 4431, patch: 17, visit: 930353, ...} = 3.769
lsst.assembleCoadd INFO: Weight of deepCoadd_directWarp {instrument: 'LSSTCam-imSim', skymap: 'DC2', tract: 4431, patch: 17, visit: 924085, ...} = 4.447
lsst.assembleCoadd INFO: Found 6 deepCoadd_directWarp
lsst.assembleCoadd.assembleStaticSkyModel INFO: Weight of deepCoadd_psfMatchedWarp {instrument: 'LSSTCam-imSim', skymap: 'DC2', tract: 4431, patch: 17, visit: 924057, ...} = 303.107
lsst.assembleCoadd.assembleStaticSkyModel INFO: Weight of deepCoadd_psfMatchedWarp {instrument: 'LSSTCam-imSim', skymap: 'DC2', tract: 4431, patch: 17, visit: 929477, ...} = 350.132
lsst.assembleCoadd.assembleStaticSkyModel INFO: Weight of deepCoadd_psfMatchedWarp {instrument: 'LSSTCam-imSim', skymap: 'DC2', tract: 4431, patch: 17, visit: 919515, ...} = 237.689
lsst.assembleCoadd.assembleStaticSkyModel INFO: Weight of deepCoadd_psfMatchedWarp {instrument: 'LSSTCam-imSim', skymap: 'DC2', tract: 4431, patch: 17, visit: 924086, ...} = 294.087
lsst.assembleCoadd.assembleStaticSkyModel INFO: Weight of deepCoadd_psfMatchedWarp {instrument: 'LSSTCam-imSim', skymap: 'DC2', tract: 4431, patch: 17, visit: 930353, ...} = 200.529
lsst.assembleCoadd.assembleStaticSkyModel INFO: Weight of deepCoadd_psfMatchedWarp {instrument: 'LSSTCam-imSim', skymap: 'DC2', tract: 4431, patch: 17, visit: 924085, ...} = 307.386
lsst.assembleCoadd.assembleStaticSkyModel INFO: Found 6 deepCoadd_psfMatchedWarp
lsst.assembleCoadd.assembleStaticSkyModel INFO: Assembling 6 deepCoadd_psfMatchedWarp
lsst.assembleCoadd.assembleStaticSkyModel.interpImage INFO: Creating psf model for interpolation from fwhm(pixels) = 3.0 [default]
lsst.assembleCoadd.assembleStaticSkyModel.interpImage INFO: fallbackValueType MEDIAN has been set to 0.0018
lsst.assembleCoadd.assembleStaticSkyModel.interpImage INFO: Interpolated over 0 NO_DATA pixels.
lsst.assembleCoadd.detectTemplate INFO: Detected 2763 positive peaks in 1888 footprints to 5 sigma
lsst.assembleCoadd.scaleWarpVariance INFO: Renormalizing variance by 1.154961
lsst.assembleCoadd.detect INFO: Detected 10 positive peaks in 4 footprints and 6 negative peaks in 5 footprints to 5 sigma
lsst.assembleCoadd.scaleWarpVariance INFO: Renormalizing variance by 1.162911
lsst.assembleCoadd.detect INFO: Detected 725 positive peaks in 151 footprints and 207 negative peaks in 126 footprints to 5 sigma
lsst.assembleCoadd.scaleWarpVariance INFO: Renormalizing variance by 1.146336
lsst.assembleCoadd.detect INFO: Detected 63 positive peaks in 35 footprints and 39 negative peaks in 24 footprints to 5 sigma
lsst.assembleCoadd.scaleWarpVariance INFO: Renormalizing variance by 1.150889
lsst.assembleCoadd.detect INFO: Detected 15 positive peaks in 12 footprints and 34 negative peaks in 20 footprints to 5 sigma
lsst.assembleCoadd.scaleWarpVariance INFO: Renormalizing variance by 1.142096
lsst.assembleCoadd.detect INFO: Detected 42 positive peaks in 36 footprints and 68 negative peaks in 25 footprints to 5 sigma
lsst.assembleCoadd.scaleWarpVariance INFO: Renormalizing variance by 1.162910
lsst.assembleCoadd.detect INFO: Detected 0 positive peaks in 0 footprints and 0 negative peaks in 0 footprints to 5 sigma
lsst.assembleCoadd INFO: Assembling 6 deepCoadd_directWarp
lsst.assembleCoadd.interpImage INFO: Creating psf model for interpolation from fwhm(pixels) = 3.0 [default]
lsst.assembleCoadd.interpImage INFO: fallbackValueType MEDIAN has been set to 0.0159
lsst.assembleCoadd.interpImage INFO: Interpolated over 278 NO_DATA pixels.
lsst.ctrl.mpexec.singleQuantumExecutor INFO: Execution of task 'assembleCoadd' on quantum {band: 'i', skymap: 'DC2', tract: 4431, patch: 17} took 243.213 seconds
lsst.ctrl.mpexec.singleQuantumExecutor INFO: Log records could not be stored in this butler because the datastore can not ingest files, empty record list is stored instead.
The quanta that was just created is a list of objects corresponding to each of the pipeline tasks that were run.
There will be one for each visit’s makeWarp and one for assembleCoadd.
Each of those has information about, e.g., the name of the task, the reference to the input and output.
Option: learn more about the quanta.
# quanta
Option: to see the pop-up window of methods for quanta, put your cursor after the period and press the tab key.
# quanta.
Option: instead of using tab, see the methods associated with an object by using dir.
# dir(quanta[0])
Display the task names for each quantum in quanta to find the one associated with the assembleCoadd task.
for q, quantum in enumerate(quanta):
    print(q, quantum.taskName)
0 lsst.pipe.tasks.makeWarp.MakeWarpTask
1 lsst.pipe.tasks.makeWarp.MakeWarpTask
2 lsst.pipe.tasks.makeWarp.MakeWarpTask
3 lsst.pipe.tasks.makeWarp.MakeWarpTask
4 lsst.pipe.tasks.makeWarp.MakeWarpTask
5 lsst.pipe.tasks.makeWarp.MakeWarpTask
6 lsst.pipe.tasks.assembleCoadd.CompareWarpAssembleCoaddTask
When this tutorial was prepared, the output of the cell above showed that the first six elements of quanta (indices 0 through 5) were the results of makeWarp for the six visits, and then the seventh (index 6) was the results of assembleCoadd.
Below, set coadd_index equal to the index for the outputs of lsst.pipe.tasks.assembleCoadd.
This should be the same unless you've changed how many visits are input to the custom coadd.
E.g.,
coadd_index = 6
coadd_index = 6
Option: display information using the inputs and outputs methods for quanta.
# quanta[coadd_index].inputs
# quanta[coadd_index].outputs
for output in quanta[coadd_index].outputs:
    print(output)
DatasetType('deepCoadd', {band, skymap, tract, patch}, ExposureF)
DatasetType('deepCoadd_inputMap', {band, skymap, tract, patch}, HealSparseMap)
DatasetType('assembleCoadd_metadata', {band, skymap, tract, patch}, PropertySet)
DatasetType('assembleCoadd_log', {band, skymap, tract, patch}, ButlerLogRecords)
DatasetType('deepCoadd_nImage', {band, skymap, tract, patch}, ImageU)
The deepCoadd is the output we're interested in. Notice that it has a DatasetType of ExposureF, so it is the image.
quanta[coadd_index].outputs['deepCoadd']
[DatasetRef(DatasetType('deepCoadd', {band, skymap, tract, patch}, ExposureF), {band: 'i', skymap: 'DC2', tract: 4431, patch: 17})]
From the square brackets, it's a list of just one element. So the DatasetRef for just our new coadd would be:
quanta[coadd_index].outputs['deepCoadd'][0]
The above output is used in Section 4.2.1, below, to retrieve the new custom deepCoadd image from the simpleButler.
Although the new custom deepCoadd that we created is not actually deep, but a rather shallower custom coadd, it will still be called deepCoadd in the butler because that is the default name of results from the assembleCoadd task.
Notice: Only use 4.2.1 "Option 1" *OR* 4.2.2 "Option 2" to retrieve the new image.
my_new_deepCoadd = simpleButler.get(quanta[coadd_index].outputs['deepCoadd'][0])
The dataId for the deepCoadd of interest was already defined:
my_dataId = {'band': 'i', 'tract': my_tract, 'patch': my_patch}
Use it to retrieve the newly made deepCoadd from the simpleButler.
So long as you use the simpleButler, it will search the collections in order, and since we made sure that the new collection we just created and wrote to appears first -- as checked in the first cell below -- it will take the deepCoadd from that new collection.
# simpleButler.registry.getCollectionChain(my_outputCollection)
# my_new_deepCoadd = simpleButler.get('deepCoadd', dataId=my_dataId)
The results have been permanently written to the butler.
If you instantiated a new butler in a new notebook:
collection = "u/<Your User Name>/coadd_recreation_nb/Window1_coadd/<Unique Timestamp>"
butler = Butler('dp02-direct', collections=collection)
Then you would be able to define the dataId in the same way:
my_dataId = {'band': 'i', 'tract': 4431, 'patch': 17}
And retrieve your new deepCoadd with:
my_new_deepCoadd = Butler.get('deepCoadd', dataId=my_dataId).
Since we already have our collection in the simpleButler, we don't need this option in this notebook.
This will be demonstrated in tutorial notebook 09b_Custom_Coadd_Sources.ipynb.
Check the inputs of my_new_deepCoadd, and compare them with the "queryString", and see that they match.
Notice: With Weekly 41 it should be possible to do:
my_new_deepCoadd_inputs = simpleButler.get("deepCoadd.coaddInputs", my_dataId, storageClass="AstropyTable")
to have the results returned as an astropy table with a single command, instead of the two below.
my_new_deepCoadd_inputs = simpleButler.get("deepCoadd.coaddInputs", my_dataId)
my_new_deepCoadd_inputs.visits.asAstropy()
| id | bbox_min_x | bbox_min_y | bbox_max_x | bbox_max_y | goodpix | weight | filter |
|---|---|---|---|---|---|---|---|
| pix | pix | pix | pix | ||||
| int64 | int32 | int32 | int32 | int32 | int32 | float64 | str32 |
| 919515 | 11900 | 7900 | 16099 | 12099 | 8982709 | 3.4656688819793495 | i_sim_1.4 |
| 924057 | 11900 | 7900 | 16099 | 12099 | 16098179 | 4.384267091685517 | i_sim_1.4 |
| 924085 | 11900 | 7900 | 16099 | 12099 | 831332 | 4.446833161599578 | i_sim_1.4 |
| 924086 | 11900 | 7900 | 16099 | 12099 | 16136708 | 4.550420295334223 | i_sim_1.4 |
| 929477 | 11900 | 7900 | 16099 | 12099 | 16280498 | 4.051326013718346 | i_sim_1.4 |
| 930353 | 11900 | 7900 | 16099 | 12099 | 16076133 | 3.7685753871220466 | i_sim_1.4 |
In the next tutorial notebook in the series, 09b_Custom_Coadd_Sources.ipynb, the new custom deepCoadd is displayed alongside the original deepCoadd (along with other comparisons between the two).
Here, just show the newly coadded image.
fig = plt.figure(figsize=(10, 6))
afw_display = afwDisplay.Display(1)
afw_display.scale('asinh', 'zscale')
afw_display.mtv(my_new_deepCoadd.image)
plt.gca().axis('off')
(11899.5, 16099.5, 7899.5, 12099.5)

In this example, only one configuration parameter was changed from the default values. This was in Section 3.4 where we set:
assembleCoaddPipeline.addConfigOverride('makeWarp', 'doApplyFinalizedPsf', False).
The configurations can be retrieved for the simpleButler with the following calls.
my_makeWarp_config = simpleButler.get("makeWarp_config", my_dataId)
my_assembleCoadd_config = simpleButler.get("assembleCoadd_config", my_dataId)
Option: print all of the keys and values for each pipeline tasks's configuration.
# for key, value in my_makeWarp_config.items():
#     print(key, value)
# for key, value in my_assembleCoadd_config.items():
#     print(key, value)
Use the next tutorial notebook in the series (09b_Custom_Coadd_Sources.ipynb) to do source detection and measurement on the new custom deepCoadd, and compare with results from the original deepCoadd.
deepCoadd for date Window2. Restart the kernel and clear all outputs. Edit Section 3 to use Window2. Note that when you get to re-executing Section 4.1 for Window2, the coadd_index will be different.my_coadd_visits_airmass = visitTable.loc[my_coadd_inputs.visits['id']]['airmass'].